For part two of our Facebook series please click HERE.
As the largest and fastest growing social platform ever created, Facebook is the benchmark for which all others social traffic sources are compared. With 1.39 billion active users every month, it’s a hive of activity and that means plenty of opportunity for people with something to sell!
The development of Facebook ads has enabled advertisers to target their ideal audience and market their products/services with great success. Leading brands, e-commerce stores and Amazon FBA sellers have all been taking advantage of this advertising channel to drive sales and grow their businesses.
In fact, businesses have been seen to acquire up to 70% of their customers through this channel. With well-optimized campaigns, e-commerce businesses have experienced up to 7x returns on ad spend.
Social media is definitely here to stay, and not getting in on Facebook advertising now would be a great opportunity missed!
Why Should Amazon FBA Sellers Love Marketing on Facebook?
The biggest attraction is Facebook’s (almost creepily good) targeting capabilities. Facebook’s global user base is certainly attractive, but the ability to identify and target specific segments is what makes it wickedly effective. Facebook collects a diverse array of data from all users, then lets marketers use it to target their desired audience.
Advertising on Facebook is powerful, user-friendly and flexible. With a little know-how, you can easily build campaigns, create ads, and get a high return on your ad spend.
Facebook is a gold-mine for Amazon sellers looking to drive high quality traffic to their listings. Not only does this increase initial profits but also gives sellers a large boost in organic rankings by increasing sales velocity and conversion rates. Ultimately, this gives Amazon FBA sellers a huge edge on their competition. Many Amazon FBA sellers are experiencing excellent results from advertising their listings on Facebook.
But what if you have no experience with the business oriented side of Facebook before? Is it even a viable option for a small-medium sized Amazon FBA seller with only a handful of listed products?
Many newcomers have concerns about difficulty, cost, and time needed to learn how to market on Facebook. But in reality, it is relatively simple to setup and the rewards can be enormous.
We’re going to break down the fundamentals so you can start driving more Amazon sales with Facebook ads. Once you’re ready, you’ll be able to begin experimenting on your own and optimizing campaigns to meet your goals.
Creating Your Business Page
The process for setting up a business page is very straightforward, here is the process broken down into 4 stages.
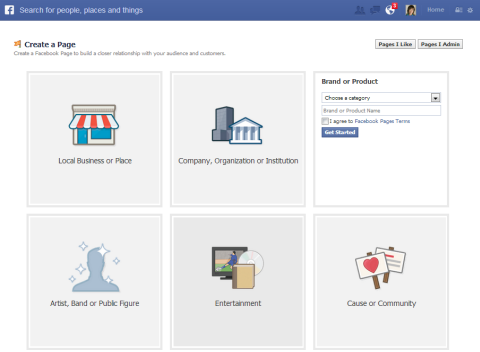
Step 1 – Select “Create a Page” from your Account
- Select the drop down menu from the top-right corner of your Facebook account
- Choose “Create a page” option
Step 2 – Select a Business Category
Facebook allows businesses to distinguish themselves using a variety of different categories:
As Amazon FBA sellers, “Brand or Product” is the most suitable category.
Step 3 – Choose Your Industry-specific Category
- Select the industry-specific category that best describes your industry
- Enter basic information about your business
- Agree to Facebook Pages terms and conditions
- Click “Get Started”
Step 4 – Launch and Page Optimization
- Add an interesting description to introduce visitors to your brand
- Include a link to your amazon product listing/e-commerce store
- Upload a profile picture
- Select “reach more people” to encourage visitors to visit your page
- Add your page to your favorites so it’s easy to find and check
Should you require more information, you can also check out Facebook’s page set up resources.
Setting Up Your Ad Account
Before you can begin creating ads, you will need to provide Facebook some personal and business details and submit valid payment information for funding your campaigns.
Step 1 – Enter Facebook Adverts Manager
From your account, look for and select either “Adverts Manager” or “Create Advert”. Or you can simply click HERE.
Step 2 – Ad Account Settings
- From the Ad Manager, select “Settings” from the left-hand toolbar
- Create an account name, time zone to be used and industry
- Indicate you will be using ads for business use
- Fill in relevant business information and address
Be careful to fill this information in carefully, you won’t be able to come back and edit these details later. The address will be used for billing purposes.
Step 3 – Billing Information
- Select “Billing” from the left-hand toolbar menu
- Select “Payment Method” then “Add New Payment Method”
- Enter credit card or PayPal information for advert funding
Bare in mind that if your primary billing card fails or reaches its limit, all campaigns will be put on hold until the outstanding balance is paid. If this is a concern, it’s advisable to add a secondary payment method at a later date. Your funding sources may be changed at any time.
Facebook’s billing is scheduled based on thresholds and billing history. Initially, you should expect to be billed when you reach a $25 threshold. If you continue to advertise regularly, this is automatically increased through $50, $250, $500 and $750. Your campaigns are completely unaffected, this is simply a case of invoicing.
The Essential Facebook Ads Types and Variables
There’s a whole range of Facebook ad types available, however, we are focusing on those most applicable to Amazon FBA sellers.
- Page Boost ads – boosts the visibility of status update from your Facebook page photo or link post
- Multi-Product/Carousel ads – showcases a catalog of products or different variations to an audience
- Page Posts Video ads – displays an auto-playing video ad that’s muted until tapped
The current trend that a lot of Facebook marketers selling physical products are seeing is that they can get the cheapest clicks using video ads just targeted to mobile users. However, this is not set it in stone, it is hard to give accurate information on how to display your ads as every product/market might perform differently. The golden rule of advertising is TEST TEST TEST.
Facebook Ad Creation
There’re three different ways to begin creating Facebook ads:
- Your Facebook page – clicking to boost existing posts to a wider audience (NOT RECOMMENDED)
- Facebook’s Ads Manager – more features and quite user-friendly
- Facebook’s Power Editor – most advanced and featured filled interface
It’s worth diving right in and getting to grips with the Power Editor. It doesn’t take too long to learn and offers the most features. The Power Editor becomes very useful for split testing, bulk creating ads, creating multiple campaigns with targeted audiences and different budgets. (Note: Facebook is constantly making changes too their platform, by the time you read this the Power Editor might be phased out and incorporated into the Ad Manager.)
Facebook divides ad creation into three separate components:
- Campaigns – the main overall group of ads (objective)
- Ad Sets – subgroups of ads (targeting, bidding)
- Ads – individual advert (creative)
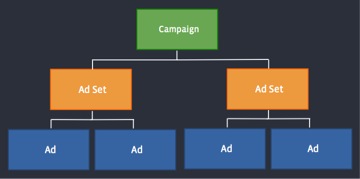
Groups and sub-groups can be used to build up different aspects of a campaign. But by changing the main objective of a campaign, changes are applied all ads within. Or if you changed the budget of a particular Ad Set, this would be applied to ads within that particular group.
Objectives
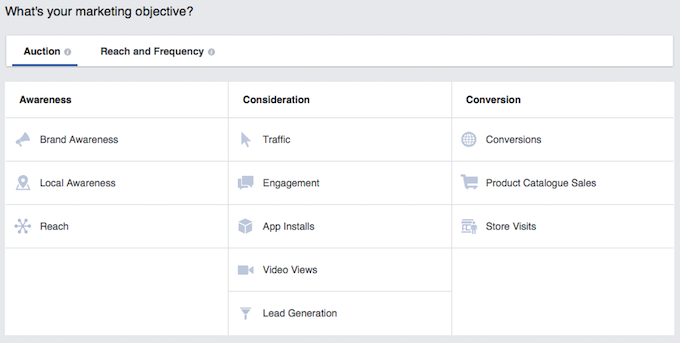
The first question Facebook asks you to choose an objective so that it can help you optimize your ads. This is achieved by automatically serving your ads to users who are most likely to perform your desired actions.
There are currently more than 10 ad objectives currently but Facebook regularly adds more. Here’s a quick introduction to the main options:
- Clicks to the website – visitors click your ad and visit your website
- Website conversions – Facebook users reach a goal page on your website, such as an order confirmation page.
- Page post engagement – users engage with your post by liking, commenting and sharing
- Page likes – increase likes on your page
- Offer claims – promote a discount or deal for your product
- Video views – gain video views
- Dynamic product ads – retarget visitors to your store and promote your product
Whichever ad objective you select, you’ll ultimately still pay for any engagement your ad receives. But as mentioned earlier, Facebook will optimize by showing your ads to users most likely to meet your objectives.
If you wanted an ad to generate email sign-ups and purchases, “website conversions” would be a good objective. Whereas if you are focusing on building up your Facebook fan base, you might consider “Page likes” as your objective.
As Amazon sellers, your ultimate goal is most likely to drive more sales. However, no single tactic, ad type or objective can guarantee this. Since every audience and brand is different, each may favor a different approach. It pays to explore different options and keep an eye on your competitors.
When it comes to choosing an objective, Kissmetrics found that ads with low-friction conversions often perform the best. So, asking for an email sign up in exchange for a discount coupon is a great way to market your product on Facebook.
Selecting Your Audience
Using the outstanding array of targeting options, your ads can be served directly to the target audience you choose. It’s well worth exploring all the options and experimenting before pulling the trigger. Categories and options include:
- Location
- Age
- Gender
- Relationship
- Education
- Language
- Work
- Politics
- Life Events
- Interests
- Connections
- Behaviors
If you want to learn more about audience targeting and all its capabilities, I recommend you read Facebook’s documentation.
Consider using fewer targeting options for an audience, then test them against each other. So, instead of targeting 4 interests within one audience, create 4 separate audiences with their own ad sets see which ones perform the best.
There’s also a useful option for creating “custom audiences”. This enables users to target their audience using existing email lists, phone numbers or retargeting pixels. This is a great tool for more advanced marketers looking to target or exclude specific users.
One huge advantage for Amazon sellers is the fact you have access to a database of customer phone numbers. You can plug these numbers directly into Facebook to create a custom audience for retargeting current customers (ideal if you sell a consumable product) and promoting new products. Facebook also enables you to build a “lookalike audience” from users that closely resemble your current customers, an invaluable feature. If you have more than 100 customers with Facebook accounts (the minimum to build this list) this is definitely a targeting option you should test.
Ad Placements
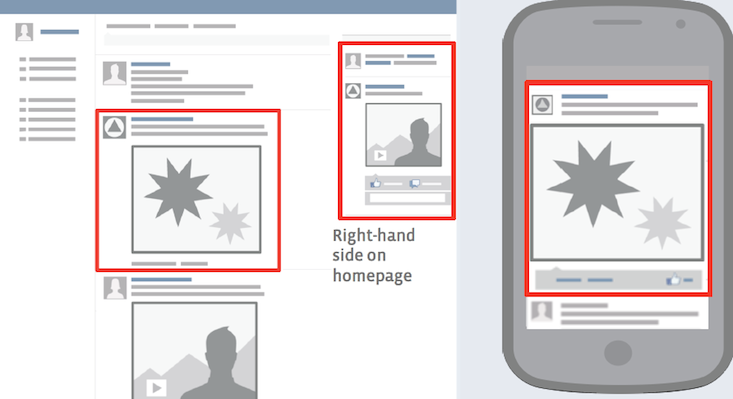
Facebook allows advertisers to display their ads in a variety of different positions and formats. These include mobile ads, desktop ads on the sidebar and desktop ads in the newsfeed.
Facebook’s mobile users are in great number and steadily growing. In many cases, mobile ads have been seen to outperform desktop ads when it comes to click-through-rates. Qwaya noticed mobile ads reported 3 times the CTR of desktop ads. Ensure your landing page or web store is completely mobile friendly to receive the best benefits. AMZPromoter makes it easy to create 100% mobile responsive landing pages in a matter of minutes.
When it comes to desktop ads, there are still two placement options to choose from. The sidebar does not require you to have a Facebook page, but has been seen to drive less engagement than news feed ads.
Setting a daily budget for your adverts provides direct control over how much you spend of your Facebook ads. You can select from either per day or lifetime budgets. Furthermore, you can set you your ads to run continuously or with specific start/end dates.
During the early stages, it’s wise to test your ads using budgets as little as $5-$20 daily. Once you’ve gathered results from multiple adverts, you’ll be able to move forward with the most effective campaigns.
Optimization and Bidding
You can set a budget and allow automated bidding based CPC (cost per click) or CPM (cost per 1000 impressions) to do the rest. Risk is effectively managed by testing new ideas by controlling maximum bids, daily budget, campaign duration and total budget. Facebook ads offer users a safe way to test their audience’s engagement with low daily budgets before scaling up.
By default, Facebook will bid for ad space automatically and optimize to suit your chosen objective. It’s advisable to leave these settings as they are until you are more experienced with this process. Upon revisiting these settings later you may be able to further improve your results.
Facebook Ads Reporting and Analysis
Upon completion, your ad will be submitted for approval by Facebook and automatically launched. You can monitor your ad performance, in real-time, through the Ads Manager reports. However, you must allow your campaign to run for at least a few days to a week before drawing any conclusions.
Results based on your chosen objective are displayed in a table format. Once a campaign has run its course, these results will provide vital insights into both ad performance and target audience.
The most significant metrics to examine include:
- Conversions – the number of users completed the desired action
- Reach – how many users have seen an ad
- Cost – cost per desired action
- Frequency – average number of times your ad for seen by a single user
- Click-through-Rate – percentage of users clicking on your ad
Remember, you should be comparing the metrics to your own ads rather, not idealistic figures. Identifying the best performers will allow you to develop more profitable campaigns in the future.
Incorporating Facebook Ads With AMZPromoter
When your customer sees your Facebook ad, where will they be sent when they click on it?
Well you have two main options; you can either send them directly to your product page or first send them to an intermediary landing page.
We strongly recommend the latter option for several reasons.
- You can capture your customers email address. This is an incredibly valuable asset (which is why Amazon masks email addresses on their platform!)
- You can put your Facebook pixel and Google analytics/conversion code on your landing page which can help build your Facebook pixel and also allow you to retarget on Facebook and Google’s display network
- You can give your customer a coupon code which greatly decreases the chance of them purchasing a competitor’s product
- Your conversion rate will be higher as your leads will be qualified before landing on your product page
Fortunately, AMZPromoter was created to simplify this exact process.
With AMZPromoter you can easily build high converting landing pages with just a few clicks because we pre-fill most of the fields using Amazon’s API. All you need to do is input your ASIN, paste in your coupons, select a few options and your landing page will be built in a matter of minutes.
Once your landing page is created you will get a unique URL which you can send the traffic to (hosted on our servers), or we provide you with a simple code snippet which will allow you to embed the page on your own domain (the best option if you want to take advantage of Facebook’s retargeting pixel).
When you set up your ad in Facebook make sure your customers are directed to the landing page you built. On the landing page there will be an opt-in button and when the customer clicks the button they will be prompted to enter their email. Once they enter it they will be redirected to a page to claim their coupon (or you have the option of making them confirm their email first).
On the coupon page, there will be a link to the product on Amazon as well as instructions on how to claim the coupon.
Final Thoughts
That’s all you need to get going, so now it’s over to you. Start crafting Facebook ads, interface them with AMZPromoter, and drive customers to your Amazon product pages to boost sales, rankings and grow your customer email list!
If you have any questions on this article please comment below!
You can read part two of this article by clicking HERE.